

DIY wood cabinet
The order in the apartment is possible only when every thing knows its place. And not everything that is in the house should be shown to outsiders. That is why cabinets will never go out of style. Large and small, built-in and suspended - there are many options. In the furniture catalog you, of course, will find a lot of interesting models. But will the price suit you? And is a beautiful locker really suitable for your interior? You can save a lot, besides, do exactly what will look good in your apartment by picking up a carpentry tool. A cabinet made of wood with your own hands - although not entirely simple, but affordable. We’ll talk about how to make it.
to contents ↑What to do?
Before you make a wooden cabinet with your own hands, you need to think about what exactly you will assemble it from. In modern apartments there is furniture made from a variety of materials:
- solid wood;
- plywood;
- Chipboard;
- MDF;
- plastic;
- metal.
It hardly makes sense to make do-it-yourself cabinets made of plastic or metal. For this, special technologies are applied that can not always be repeated at home. Of course, if you have a welding machine and you know how to work with it, you are likely to cope with the manufacture of metal furniture. But more often than not, home craftsmen who decide to start making furniture give preference to wood and other lumber.
to contents ↑Lumber
In the hardware store you will find a variety of lumber. The cabinet can be made of different types:
- whole boards;
- compressed shields;
- glued shields.
Solid boards
Solid boards are a traditional material, very beautiful and of high quality. It only needs to be cut into pieces of the desired shape, soaked in stain, polished or varnished. For the manufacture of furniture, many different breeds are used:
- oak;
- beech;
- sycamore;
- ash;
- acacia;
- hornbeam;
- sandalwood;
- Birch;
- Pine;
- nut;
- maple.
And more than three dozen breeds.
The breeds can be divided into two types:
- solid;
- soft.
Hard breeds include such species as plane tree, ash, oak, etc. Soft - birch, fir, chestnut. What to give preference to?
- Oak or beech cabinets always look great. These are traditional materials, they have been used for a very long time, and furniture from them can serve for centuries. This wood does not lead, it does not crack and does not break. But in order to work with oak or beech boards, some carpentry skills are needed.
- Novice masters often prefer birch boards - they are less durable, easier to deform, however, they are much cheaper and easier to process. As for appearance, then in a hardware store you will be shown a dozen or two wood stains that allow you to turn light birch wood into anything - even a nut, even a sandalwood.
- If you want a good wardrobe from inexpensive boards - feel free to choose a pine. From it you can make a fairly strong frame, and quite elegant decorative elements. The pine wood is light, it is better to varnish it. Among other things, this tree has a very pleasant aroma that has beneficial effects on the respiratory system.
Important! Quite often, craftsmen make cabinets from several breeds:
- solid - frame;
- from soft - internal parts, a facade and decorative elements.
Compressed and glued boards
Recently, among amateur furniture makers, these materials have been very popular. There are several reasons for this:
- low cost;
- to process is a pleasure;
- some shields do not need to be processed, because they already have a laminated coating.
By the way, the laminate layer on the chipboard is very different, so you probably will find something interesting for you. Some coatings are on the eye and cannot be distinguished from natural wood of a noble breed.
to contents ↑Important! But there are features that should be kept in mind. Such shields often do not hold fasteners well. That is, if you are dealing with glued plywood, then everything is in order, the screws will sit like a glove. But with the chipboard, everything is somewhat worse, it is better to fix the fasteners on glue. And it is not worth disassembling products from chipboard - it is better to make a new cabinet.
Where will the workshop be?
If you are planning to make a cabinet out of boards with your own hands, take care of exactly where you will do it. Do not expect that you will build a closet in one evening, so the room will be needed for a sufficiently long time. It must meet certain requirements:
- it should be spacious so that you can place both boards and tools, and you will have to leave blanks for several days, or even weeks;
- it should be dry there - the tree does not tolerate high humidity;
- it is better if the temperature is the same as in the room where your cabinet will stand - then you can do without deformations;
- need good ventilation.
The best thing, of course, is to make a cabinet of wood with your own hands as close as possible to the place where it will stand, so you will have to persuade your household not to complain too much about some mess.
to contents ↑What to do?
A wooden cabinet with their own hands cannot be built with a penknife, or even a kitchen one. Knives, of course, will be needed too, but not only them. At the right time in the right place should be:
- hacksaw;
- jigsaw (for some very delicate work, you can also purchase a manual one);
- plumb line;
- level;
- roulette:
- long ruler (or better, folding meter);
- drill;
- screwdriver (generally a drill at low speeds can replace it, but it’s better after all, when there is a separate one);
- Screwdriver Set;
- set of planers;
- wood glue;
- fasteners (dowels, screws, as well as furniture corners).
to contents ↑Important! Some elements can be ordered ready-made - for example, doors that will already be with handles and even decorative overlays.
Project
So, you have already decided whether the landlord himself can make a wooden computer cabinet (or any other - the principle of operation is the same, only the appearance and materials differ).
Where to begin? A good plan is already half the battle. In this case, you will need a project, which, in turn, begins with measurements. You need to know:
- construction height;
- width
- cabinet depth;
- number of sections;
- number of floors;
- number of shelves and drawers;
- their sizes.
With the general dimensions of the construction, problems usually do not arise, no one wants to make an object that will not fit in the room later. But with the floors and sections, everything is much more interesting. You can make a cabinet:
- of two sections, with ordinary doors, each of which closes a half of the cabinet, and in full height;
- of two sections with a mezzanine - you will need 4 doors, 2 for the main part and 2 smaller ones for the mezzanine;
- of two sections with a podium - at the bottom there is a horizontal section with a hinged door or several drawers;
- of two sections with a podium and a mezzanine;
- different versions of three-section cabinets - most often it is a three-wing cabinet, in one section of which shelves are located, in another - a place for clothes, and below - drawers.
Thinking what you like best? Then you can start drawing. Moreover, it is not necessary to pick up a pencil. At your service - a computer and many design programs.
to contents ↑Important! If you don’t like AutoCAD (or if you don’t like it for interior architecture), you can use various designers working online. It is enough to enter which subject you want to make and put down the dimensions, and the program will offer you materials, color, decor, and much more.
Layout and layout
After the sketch is ready and the dimensions are stamped on it, you can make a layout. She is needed to submit it to the workshop, where you will order the elements of your future cabinet.
It is much more convenient to cut a wooden plate with the help of special equipment that is in any company working with lumber, but most likely is not available in your home. If you decide to go all the way as a cabinetmaker without involving third-party companies, you will also need this layout, since it allows you to cut the material most economically. As for the scheme, it is better to take the finished one, good, on the Internet they are now higher than the roof, of all kinds and from any wood.
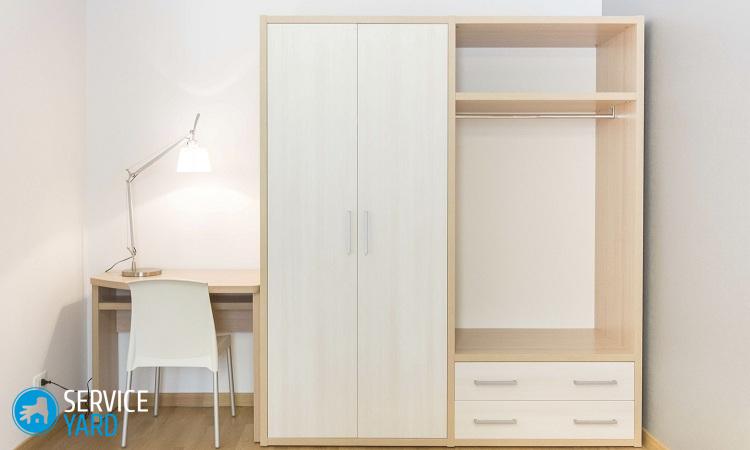
to contents ↑Simple wardrobe
This is a versatile wardrobe that can stand in any room, but looks especially good in a long and narrow hallway.
What do you need for a cabinet? Details of the following size:
- boards for the base and roof of the frame 1500x600 mm - 3;
- boards for the sidewall 2000x600 mm - 2;
- partition board - 1350 x 600 mm - 1;
- 3 boards for short vertical and horizontal partitions and partitions for shelves;
- guides for doors.
Like any cabinet furniture, the cabinet begins to assemble from the frame:
- Put one of the 1.5 meter boards on the floor.
- Attach one of the side walls, that is, 2 m long boards - it is best to do this using the corners, which need at least 3 for each sidewall.
- Check the angle - it should be straight.
- Fasten the second sidewall.
- Designate a place for a large vertical partition.
- Attach the partition to the base of the cabinet.
- Designate places for low partitions - this design has three of them, but there can be any other quantity.
- Fix the short partitions on the base with screws and corners - do not forget to check the corners.
- Mark the space for the shelves on the partitions - there can be any number that suits you.
- Fasten the horizontal rails for the shelves and remember to check that each shelf is parallel to the base of the cabinet.
- Close it all on top of another one and a half meter board.
- Make the back wall of the fiberboard and nail it to the body - and if the cabinet is built-in and stands close to the wall, you can do without a backside at all.
Important! It is better if such a design is on legs - places for them can be outlined in advance.
Make the door
The doors of the wardrobe are simply two panels that move along the rails (they can be on top and bottom). Before you put them, you need to think about how your cabinet will be closed. Ordinary handles are not very convenient, you can just make cuts - round or in the form of slots.
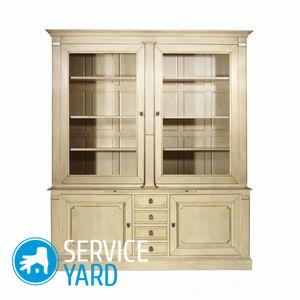
to contents ↑Cabinet with lock
This is a double-wing cabinet with a shelf that separates approximately one third of the internal volume. The principle of its manufacture is the same as that of the previous model. But you can apply a different order - for example, first completely make the frame, and separately - the internal structure, then combine it all:
- Mark up on a wooden board or sheet of plywood.
- Cut parts to exact sizes.
- Choose boards for the frame and lay them on the floor, here the design will be assembled, and only then placed vertically.
- Mark the holes for the tongue and groove holes.
- Coat the tongues themselves with carpentry glue.
- Also glue the joining lines of the parts.
- Connect the boards into a rectangular frame.
- Strengthen the joints from the inside with corners and screws.
- Attach the guides for the removable shelves - the strips can be wooden or plastic, the screws are screwed inside.
- Attach the back wall - usually a fiberboard.
- Saw the notches under the doors.
- Hang the door.
- Designate a place for the castle - both of its parts should be located exactly on the same level, otherwise - the castle simply will not close.
- Drill the lock holes.
- Screw the handles.
- Now you can put the cabinet on its legs, pre-drilling holes.
- Fasten decorative elements - for example, a protruding profiled strip at the top.
to contents ↑Important! You can make such a cabinet from two or three floors - for example, close the lower part with ordinary doors, and the upper one with glass.
Finish finish
Any cabinet, except that it is made of chipboard, urgently needs to be brought to mind. Design methods are not so few. To paint wooden products is hardly advisable - it is better to use a stain. On top of such structures are usually varnished. This is done like this:
- Of course, you carefully selected the boards and brought them to an acceptable appearance before work, that is, there are no knots or chips on them, so you just have to sand them with a fine sandpaper (it is better to use a grinding machine - it will work faster).
- Putty all the holes, including under the fasteners, while it is better to take a putty in the color of wood.
- Sand your work again.
- Coat all surfaces with varnish.
- Let the cabinet dry.
- Apply another coat of varnish.
- Polish the cabinet.
to contents ↑Important! There are other types of finishes - for example, you can paste a cupboard with self-adhesive film to match the color of the rest of the furniture, the same wallpaper that the room is decorated to fit the built-in design, and models from particleboard can be decorated with veneer.
Stock footage
Assembling a cabinet, no matter what it is designed for, is not such an impossible thing. Of course, this takes some time, sometimes even quite long, but then you can do what you need, and it will cost only the cost of materials.
- How to choose a vacuum cleaner taking into account the characteristics of the house and coatings?
- What to look for when choosing a water delivery
- How to quickly create comfort at home - tips for housewives
- How to choose the perfect TV - useful tips
- What to look for when choosing blinds
- What should be running shoes?
- What useful things can you buy in a hardware store
- Iphone 11 pro max review
- Than iPhone is better than Android smartphones
 (No ratings yet)